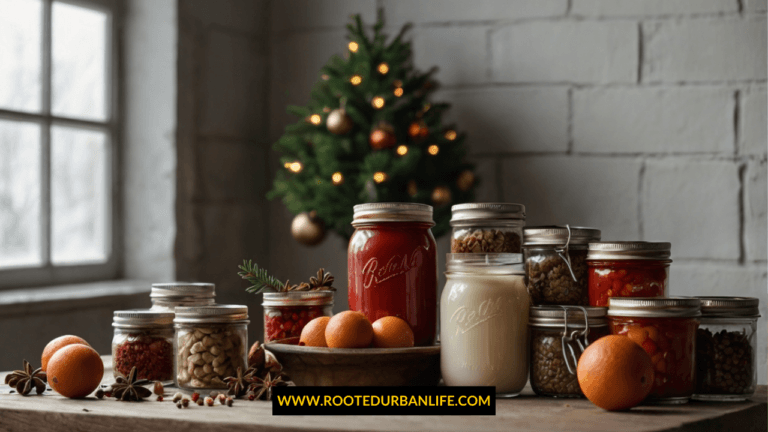
Late Summer Canning Recipes for Beginners: Turn Your Container Garden Bounty Into Year-Round Flavor
Transform your small-space harvest into pantry gold with these foolproof preservation methods
Problem: Your container garden is exploding with zucchini, cucumbers, and beans, but you’re drowning in produce faster than you can eat it. Sound familiar? You watch beautiful vegetables go bad while knowing there’s got to be a way to preserve that fresh-from-the-garden taste for months to come.
Solution: Easy canning transforms your abundant harvest into shelf-stable treasures that’ll make winter meals sing with summer flavors. No fancy equipment, no complicated techniques – just simple, safe canning recipes for beginners that actually work.
What you will learn: This post walks you through beginner-friendly canning and preserving recipes specifically designed for container gardeners. You’ll master quick pickles, simple relishes, and easy preserves using zucchini, cucumbers, and beans – the holy trinity of small-space abundance. By the end, you’ll have a clear canning process step-by-step and enough confidence to start home canning like a pro.
Ready to turn that overwhelming harvest into your secret weapon for delicious meals all year long?
Recommended Resources
Before diving into DIY canning, let’s talk essential gear. Don’t worry – canning for beginners doesn’t require breaking the bank or dedicating half your kitchen to equipment.
Must-Have Items:
- Large pot with lid (your existing pasta pot works perfectly)
- Mason jars with new lids (start with pint and half-pint sizes)
- Jar lifter or sturdy tongs
- Basic measuring cups and spoons
- Clean kitchen towels
Nice-to-Have Upgrades:
- Water bath canner (makes the process smoother)
- Canning funnel (reduces spills and mess)
- Bubble removal tool (a plastic knife works too)
Budget-friendly food preservation ideas start with using what you already own. That big stockpot? Perfect canner. Those measuring cups? Already canning supplies ready to go.
Quick Cucumber Pickles
Let’s start with the gateway of home preserving recipes – cucumber pickles that’ll be ready to eat in just 24 hours.
These quick pickles were my first canning tutorial success. No pressure canning, no fear of botulism, just crisp, tangy perfection that impressed everyone who tried them.
Implementation Steps:
- Slice 2 pounds of small cucumbers into spears or coins
- Layer cucumbers with 2 tablespoons of salt in a colander for 2 hours
- Rinse thoroughly and pack into sterilized pint jars
- Combine 1 cup white vinegar, 1 cup water, 2 tablespoons sugar in a saucepan
- Add 1 teaspoon mustard seeds and 1/2 teaspoon peppercorns per jar
- Pour hot brine over cucumbers, leaving 1/2 inch headspace
- Process in boiling water bath for 10 minutes
Warning: Don’t skip the salting step – it’s what keeps your pickles crisp instead of mushy.
Imagine opening your pantry six months from now and seeing rows of jewel-bright pickle jars. The satisfying pop of the lid, that first crisp bite that tastes like summer sunshine, knowing you created this magic from cucumbers you grew yourself.
Zucchini Bread & Butter Pickles
Transform that monster zucchini into something your family will actually beg for – these canning simple recipes prove zucchini can be the star.
After my third baseball-bat-sized zucchini in one week, I was desperate. These pickles saved my sanity – I was getting tired of zucchini bread for breakfast, lunch, and dinner.
Implementation Steps:
- Slice 3 pounds of zucchini into 1/4-inch rounds
- Slice 2 large onions thinly
- Salt vegetables heavily and let drain for 3 hours
- Rinse and drain thoroughly
- Heat 2 cups vinegar, 1 1/2 cups sugar, 1 tablespoon mustard seed, 1 teaspoon turmeric
- Add vegetables to hot brine, heat until just boiling
- Pack into hot jars and process 10 minutes in water bath
Pro Tip: The secret ingredient? That turmeric gives the beautiful golden color that makes these pickles Instagram-worthy.
Picture serving these gorgeous golden pickles at your next barbecue, watching faces light up when you casually mention you made them from your own zucchini. The pride of turning garden abundance into gourmet goodness never gets old.
Dilly Bean Bonanza
Green beans get a tangy makeover that’ll have you snacking straight from the jar – these homemade preserved foods disappear fast.
My container bean plants went crazy one August, producing more than I could blanch and freeze. These dilly beans became my secret weapon for cocktail parties and healthy snacking.
Implementation Steps:
- Trim 2 pounds of fresh green beans to fit in pint jars
- Pack beans vertically in sterilized jars
- Add 1 head of fresh dill and 1 garlic clove per jar
- Combine 2 1/2 cups water, 2 1/2 cups vinegar, 1/4 cup salt
- Bring brine to boiling, pour over beans leaving 1/2 inch headspace
- Add 1/4 teaspoon red pepper flakes per jar for heat (optional)
- Process 10 minutes in boiling water bath
Mistake to Avoid: Don’t pack the beans too tightly – they need room for the brine to circulate for even pickling.
Envision yourself pulling these from the fridge for unexpected guests, the satisfying crunch as you bite into a perfectly pickled bean that tastes better than anything store-bought, knowing your small garden produced restaurant-quality appetizers.
Zucchini Relish Revolution
This easy canning recipe transforms excess zucchini into a burger-topping superstar that’ll make your summer grilling legendary.
I started making this relish to use up zucchini, but now I grow zucchini specifically for this recipe. It’s become my signature hostess gift and the condiment everyone asks about.
Implementation Steps:
- Grate 10 cups of zucchini coarsely
- Grate 4 cups of onions
- Salt heavily and let drain overnight in colander
- Rinse thoroughly and squeeze out excess water
- Combine with 2 1/4 cups vinegar, 4 1/2 cups sugar, 1 tablespoon each: celery seed, mustard seed, turmeric
- Simmer 30 minutes until thickened
- Ladle into hot jars, process 10 minutes
Game-Changer: This relish elevates everything from hot dogs to tuna salad. It’s like having a gourmet condiment factory in your pantry.
Think about the moment when someone takes their first bite of your burger topped with this bright, tangy relish, their eyes widening in surprise at how something so simple can taste so complex and delicious.
Sweet & Sour Cucumber Medley
This homemade canning idea combines the best of pickles and relish into one versatile condiment that works with everything.
Implementation Steps:
- Combine 4 cups sliced cucumbers, 2 cups sliced onions, 1 cup diced bell peppers
- Salt vegetables and drain 2 hours
- Mix 1 cup vinegar, 3/4 cup sugar, 1 teaspoon celery seed, 1/2 teaspoon mustard seed
- Heat brine to boiling, add drained vegetables
- Simmer 10 minutes until vegetables are heated through
- Pack hot into jars, process 15 minutes
Imagine having this versatile condiment ready to transform any simple meal into something special, the satisfaction of opening your pantry and seeing the fruits of your garden labor lined up like little soldiers of flavor.
What I Wish I Knew
Lesson #1: Start small. My first canning 101 attempt involved trying to can everything in one weekend. I ended up overwhelmed and with uneven results. Pick one recipe, master it, then expand.
Lesson #2: Fresh lids matter every single time. I tried to save money reusing lids and ended up with jars that didn’t seal. New lids are cheap insurance for safe canning recipes for beginners.
Lesson #3: The 24-hour wait is crucial. I used to check jar seals immediately after processing, but some take hours to properly seal. Patience pays off in food preservation.
Frequently Asked Questions
Q: How long do these pickles last? A: Properly canned and sealed, these will keep for 1-2 years in a cool, dark place. Once opened, refrigerate and use within 2-3 months.
Q: Can I reduce the salt/sugar in these recipes? A: For safety and proper preservation, stick to tested recipes exactly as written. The ratios ensure safe acidity levels for beginning canning.
Q: What if my jars don’t seal? A: Refrigerate any unsealed jars and use within a week, or reprocess with new lids within 24 hours.
Q: Can I use different vegetables? A: These recipes are tested for safety with specific vegetables. Substitutions can change acidity levels and aren’t recommended for canning foods for beginners.
Q: Do I need a pressure canner? A: Not for these recipes! All are high-acid foods safe for water bath canning, making them perfect for how to start canning for beginners.
Key Takeaways
Master the Basics: These long term canning recipes prove that canning tutorial success comes from understanding fundamentals, not fancy equipment. Safety First: Following tested recipes exactly ensures your home canning adventures end with delicious, safe food rather than kitchen disasters. Start with Abundance: Container gardening creates the perfect scenario for learning preserving food for beginners – you’ll have plenty of practice material! Build Confidence: Each successful batch builds your guide to canning expertise and makes the next recipe feel less intimidating.
Next Steps
Ready to expand your DIY canning skills? Here are logical next steps in your preservation journey:
“Pressure Canning 101: Safe Methods for Low-Acid Foods” – Once you’ve mastered water bath canning, pressure canning opens up a world of possibilities for preserving complete meals.
“Freezing vs. Canning: Which Preservation Method Works Best” – Learn when to can and when to freeze for maximum flavor and convenience in your small-space homestead.
“Building Your Canning Pantry: Essential Equipment and Ingredients” – Dive deeper into creating an efficient canning setup that grows with your skills and harvest.
Final Recommended Resources
Your Canning Success Kit:
Ready to make this the year you master food gardening preservation? These tools will set you up for easy things to can for beginners success:
- Ball Complete Guide to Home Preserving – The bible of safe canning practices
- Starter Mason Jar Set – Mix of sizes for different recipes
- Basic Water Bath Canner – Upgrade from that stockpot when you’re ready
- Canning Labels – Date and identify your creations like a pro
Your container garden abundance doesn’t have to overwhelm you anymore. These kitchen hacks food preservation methods transform that “too much zucchini” problem into a “not enough mason jars” celebration.
Take action today: Pick one recipe that uses vegetables currently growing in your containers. Gather your supplies, follow the steps exactly, and experience the magic of turning fresh harvest into shelf-stable treasures.
Join the community: Sign up for weekly tips and seasonal canning guides that’ll keep you preserving like a pro all year long. Share your first canning success in the comments – I love hearing about those first perfect “pop” moments when jars seal!
Remember, every canning expert started exactly where you are right now. Your container garden abundance is calling – answer with a mason jar and watch the magic happen.